
What’s Included

Mounting Examples
Waterproof Housing

Top Helmet Mount

Side Helmet Mount
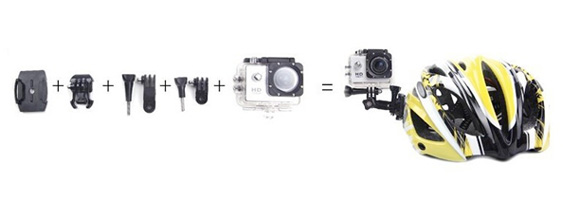
Bike/Handle Bar Mount

Belt Holster / Clip

Dash Camera Kit (Sold Separately)

Camera Diagram

Waterproof Housing
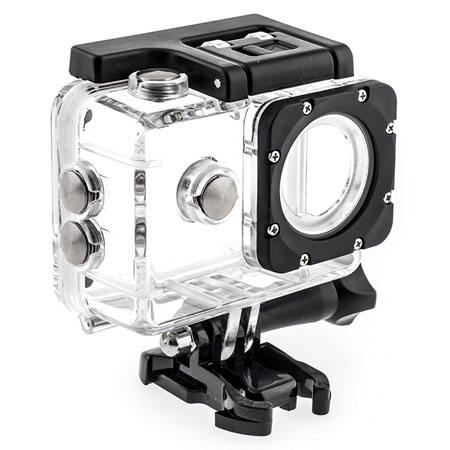 The SJCAM SJ4000 Series Action Camera’s include a waterproof housing that’s rated for depths of 100 feet or less. It’s important when using the camera for watersports that you take special care of the waterproof housing.
To prevent water damage, properly examine the rubber seal that lines the camera housing before each use. A tight seal is required, even a small piece of sand can disrupt the seal and jeopardize waterproof capability. When using in salt water, rinse the waterproof housing using non-salt water after each use. Not doing so will cause corrosion and damage the buttons.
If the waterproof housing experiences any sort of fall or accident, be sure to test empty in water, check for leaks prior to using it with the camera.
Features
![]()
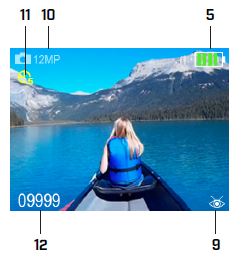
LCD Screen
The SJCAM SJ4000 Series is equipped with a 2” TFT LCD Screen. Along with displaying photos and videos, the LCD Screen will also display valuable information about the camera settings. These visual aids should help you learn and identify the meaning of each icon.
Video Mode OSD

Photo Mode OSD
Playback Mode OSD

- Recording Status:
- Flashes Red while recording. The countdown indicates available recording time on current memory card.
- Solid yellow reflects standby mode and confirms camera is ready to use.
- Resolution
- Loop Recording
- Internal microphone
- Battery Indicator
- Motion Detection
- Date
- Time
- Field of View
- Image Resolution
- Photo Lapse
- File Indicator, this number will count down as the memory card fills up.
- Play/Pause Indicator
- Filename
Getting Started
Installing the Memory Card
The SJCAM SJ4000 Series camera is compatible with microSD memory cards up to a maximum size of 32GB. A Class 10 or UHS-1 rating is required. It’s always advised to Format the memory card using the camera settings before use. This will ensure the correct format and file system gets installed.
Inserting the microSD Card
- Insert the memory card into the micro SD card slot. Do not force the memory card into place, when seated correctly it will easily clip in.
- To remove, gently press down on the memory card to disengage the spring loaded card slot.
Powering On & Off
- To Power On: Press the Power/Mode button. The camera speaker will chime and LCD screen will turn on. Once the LCD screen displays a live view, your camera is ready to use. The camera will always default to Video Mode when powered on.
- To Power Off: Press and hold the Power/Mode button for 2 seconds. The LCD screen will turn off and camera speaker will chime.
Charging The Battery
The Battery Indicator on the camera LCD screen will show current charge levels. If the battery dies while recording, the camera will save the file before automatically powering off. The included lithium-ion battery comes partially charged. A full charge is not required although is recommended.
To Charge The Battery:
- Remove the camera from the waterproof housing and connect the camera to a USB power supply, including a wall charger or desktop
charging base. - The red status light remains on and the camera LCD screen displays the battery-charging indicator.
- The red status light will turn off once the battery is fully charged.
You can also record while charging. With the camera connected to the USB power supply and the battery charging indicator displayed on the LCD screen, press the Power/Mode button to fully power on the camera. You’re free to use the camera as normal.
Removing The Battery
The SJCAM SJ4000 Series battery is removable and replaceable to prolong the life of the camera in the event of battery failure.
To Remove The Battery:
- Slide the cover button therefor releasing the battery cover.
- Lift the pull-tab on the battery to fully remove it from the camera.
Maximizing Battery Life
Using the default settings, the camera is rated for 70 minutes. Conditions such as WIFI usage, LCD screen usage and temperature will greatly affect the camera runtime.
By manually adjusting the camera setup, you can help maintain optimal ratings. Enable the Screensaver to it’s lowest setting and set up Auto Power Off. To maximize the battery, do not enable WIFI.
When using in cold climates, the camera and batteries should be kept warm when not in use.
WIFI + Mobile App
The SJCAM SJ4000-wifi and SJ4000+ cameras are equipped with WIFI. This WIFI system will broadcast its own private wireless network for your Android or iOS device. Using the mobile app, your mobile device will act as full-featured remote control and remote viewing agent for the camera. Preview, download and manage files directly from your smartphone or tablet!
To Enable WIFI:
- With the camera turned on, press the UP button to enable WIFI.
- The SJ4000 will broadcast it’s SSID, the LED status indicator will flash repeatedly and the WIFI settings will be displayed on the LCD
screen.
To Connect Your Mobile Device:
- Using the mobile device, connect to the wireless network of the camera. The SSID and Password will be displayed on the cameras LCD screen.
- Once the mobile device has connected to the camera, the LED status indicator will go solid and the LCD screen will change to Video Mode.
- Using your mobile device, launch the SJCAM Zone Camera App.
- Tap the “Connect Your Camera” button.
For more information about app usage, please visit xtremesportdv.com
Transferring Files To A Computer
- Connect the camera to your computer using the included USB cable. The camera will power on and LCD screen will display its menu.
- With “Mass Storage” highlighted, press the OK button.
- Using the computer, navigate to “Removable Storage”. When using Windows, this will be displayed in the My Computer window. Apple users will see the drive mounted to the desktop.
- Drag and drop the files from the camera into the desired save location on your computer.
Alternatively, most micoSD cards come with an adapter. Using this adapter you can remove the memory card from the camera and plug it directly into the computer’s media card slot (if available).
Camera Mode
The SJCAM SJ4000 Series Camera’s feature several camera modes. To cycle through the modes, press the Power/Mode button until desired camera mode is located. Refer to Camera Setup for detailed information about setting up specific camera modes such as photo lapse, video lapse or burst mode.
Video
The SJ4000 defaults to full HD 1080p video at 30fps. Once the camera is powered on, you’re ready to shoot video. To start/stop recording, press the OK button.
Photos
Photo mode is accessed by pressing the Power/Mode button one time from the video mode default setting. The on screen display will represent your current photo settings as configured during Camera Setup. To take a photo, press the OK button.
Playback
To preview video and photos stored on the memory card, press the Power/Mode button to toggle to the playback screen. Videos are displayed on the LCD screen in a 16:9 aspect ratio, photos are shown full-screen in a 4:3 aspect ratio.
To Play Files:
- Press the OK button to play/pause video footage.
- Use the up/down arrows to navigate through the files.
To Delete Files:
- Select the file you want deleted by making sure it’s shown on the LCD screen.
- Press the Power/Mode button one time to switch to the setup screen.
- Use the UP arrow to quickly find the “Delete” option.
- Press the OK button
- You have two options for delete. “Delete Current” will only delete the current file selected in step 1. “Delete All” will delete all files stored on the memory card.
- Confirm your selection by pressing the OK button.
Camera Setup
Overview
The SJCAM SJ4000 Series Camera has many features and options that are configurable through the setup menu. Options such as: photo lapse, video lapse, burst mode, motion detection and dash camera mode will all need to be enabled prior to use. It’s also a good idea to confirm all current settings and adjust as necessary.
Zoom
The SJ4000 offers 4x digital zoom in Video and Photo modes.
To Zoom In:
- Press and hold the UP button.
To Zoom Out:
- Press and hold the DOWN button.
Resolution
The SJ4000 default video resolution is 1080p @ 30 fps. This can be changed in the setup menu to any of the following resolutions.
| Video Resolution | FPS | Screen Resolution |
|---|---|---|
| 1080p | 30 | 1920x1080, 16x9 |
| 720p | 30/60 (frame doubled) | 1280x720, 16x9 |
| WVGA | 30 | 848x480, 16x9 |
| VGA | 30 | 640x480, 4x3 |
Loop Recording
With loop recording turned on, the camera will continuously record and overwrite older files stored on the memory card.
The camera default setting is set to 3 minute video files. This can be changed to OFF/3/5/10 minutes. In normal circumstance this setting should be turned OFF unless using the camera as a Dash Cam.
FOV
FOV stands for Field of View and is the extent of the observable image that is shown on screen. By default this is set to OFF and the full 170° lens will be utilized. The camera can adjust so the FOV is: OFF/Wide/Middle/Narrow
WDR
WDR stands for Wide Dynamic Range and is a technique used to reproduce a greater dynamic range of luminosity. It essentially takes a series of images, each shot with different exposure from darkest to lightest. WDR combines the best parts of the three images to create a more dynamic image with beautiful shadows and highlights. The WDR setting is off by default.
Motion Detection
With motion detection turned on, the camera will automatically start recording once motion is detected, once the motion stops, so does the recording. By default motion detection is turned off.
Audio
By default Audio is turned on, however, if you wish to completely disable the built in microphone the audio can be turned off.
Volume
In some situations you may want to increase or decrease the sensitivity of the built in microphone. By default the volume setting is 7 but can be adjusted to levels 1-8.
Date Stamping
By default the date stamp is set to on. This will overlay the current day/time stamp on the photo or video during playback.
TV-Out
Turn on TV-out if you wish to connect the camera to an external display. This connection is made using the optional HDMI cable. By default TV-out is off.
TV Mode
Use according to your display settings. This is used in conjunction with the TV-out setting. Typically if you’re inside North American this should be set to NTSC. Outside North American typically uses PAL.
OSD Mode
OSD stands for On Screen Display. The OSD will be displayed on the LCD screen when the camera is in a Video or Photo mode. These visual icons are a representation of the camera’s current settings and battery life. OSD is turned on by default and is only shown on the cameras LCD screen, not the final outputted video or photo.
Video Lapse
While using Video Mode, Video Lapse will automatically create and stitch the still images together and create a playable timelapse .MOV file. Video Lapse is off by default and can be manually set to: 1 / 2 / 5 / 10 / 30 / 60 Second intervals. When enabled, the camera will repeatedly take a still photo on the selected interval. The recording timer is a representation of the playback speed.
Image Size
The camera default image resolution is 12MP 4032x3024. This can be changed in the setup menu to any of the following resolutions.
| Image Resolution | |
|---|---|
| 12 MP | 4032 x 3024 |
| 10 MP | 3648 x 2736 |
| 8 MP | 3264 x 2448 |
| 5 MP | 2592 x 1944 |
| 3 MP | 2048 x 1536 |
| VGA | 640 x 580 |
| 1.3 MP | 1280 x 960 |
Quality
The quality setting is used to determine the amount of compression the camera will apply to a JPG photo. Your camera can increase or decrease the level of compression used. By default, “Medium” quality is selected and provides great quality and lower file sizes. Fine = High Quality, low compression. Medium = Medium Quality, medium compression. Standard = standard quality, standard compression.
Sharpness
Sharpness is in relation to how crisp or “sharp” the image appears between the edges of the pixels. As it sounds, this setting can be used to adjust the overall appearance of photos or video. The default setting is “Normal” but can be changed to: Strong, Normal, or Soft.
White Balance
White balance is the process of removing unrealistic color casts from your photo or video. Objects that appear white in person are rendered as white in your photo or video. Proper white balance will take into account the color temperature of a light source and adjust the relative warmth or coolness of the image accordingly. By default the camera is set to “Auto”, however this can be manually set to: Auto, Daylight, Cloudy, Tungsten or Fluorescent.
ISO
ISO is the level of sensitivity your camera has to available light. The lower the ISO number, the less sensitive it is to light. The higher ISO number increases the sensitivity of your camera, it’s also more prone for the camera to induce grain into your images. Typically “Auto” works best which is the default setting, however, if you need manual control this can be manually changed to: 100/200/400/800 or 1600.
Color
By default color mode is “Normal”, this will render images with standard colors. However, this can manually be adjusted to: B&W, Retro, Warm, or Cool. These image effects are only available for use when the camera is used in Photo Mode.
EV
EV stands for Exposure Value. This is the number that represents a combination of the cameras shutter speed and f-number. Although you cannot manually adjust the f-stop or exposure values, you can introduce Exposure Compensation for some manual control over the photo/video exposure. (+) values will brighten and (-) values will darken the recorded image. By default the EV is +0.0 and works well for almost all situations. However, this can manually be adjusted a total of (+/-) 2 stops in 1/3 stop increments.
Underwater Mode
Enable underwater mode for fascinating underwater snorkeling and diving footage. This feature helps reproduce accurate color for underwater use. Underwater Mode is disabled by default.
Photo Lapse
While using the Photo Mode, Photo Lapse will automatically capture still images repeatedly on the selected intervals. Photo Lapse can be manually set to take photos every: 2 / 5 / 10 / 20 Seconds. The default setting is S-Shot (Single Shot).
Burst Mode
With Burst Mode enabled you’re able to capture still photos at 3, 5 or 10 photos per second. This setting is turned off by default.
Dash Cam
With Dash Cam enabled this mode will automatically turn ON the camera and start recording video when power is applied. Perfect for when you have the camera mounted on your windshield and plugged into the power adapter. When the vehicle turns off, so does the camera. Please note the optional dash camera accessory kits are sold separately.
License
While using as a dash camera, you may enter your license plate number here.
Date/Time
The time and date should be set correctly and frequently checked to make sure it’s still accurate. If you have the time-stamp enabled it’s a good idea to make sure it’s accurate.
To Set the Date/Time:
- From the setup menu, find Date/Time and press the OK button.
- With the field highlighted, press the UP or DOWN button.
- Confirm selections with the OK button.
- Once complete press the Power/Mode button to save and return to the
main setup screen.
Auto Power Off
To ensure you get the most enjoyment from the SJCAM SJ4000-WIFI the default setting will automatically power off after 3 Minutes on inactivity. This can be manually changed to 3, 5 or 10 Minutes.
Keypad Tone
The keypad tone is turned ON by default. Set to OFF to disable sound.
Screensaver
By default the screensaver will power off the LCD screen after 1 minute of inactivity. This can be manually changed to: OFF/ 30 sec. / 1 Minute / 3 Minutes / 5 Minutes.
Frequency
The SJCAM SJ4000 Series Camera is able to change frequencies between 50Hz (PAL) and 60Hz (NTSC). Be sure to match the frequency setting with the electrical frequency of your current environment.
Rotate
If your mounting the camera upside down to achieve better angles, this option allows you to flip the image and appear as the camera is mounted correctly.
Watermark
Displays a watermark logo on the footage.
WIFI Password
To change the default WIFI password:
- From the setup menu, highlight WIFI Password and press the OK button.
- To navigate selections, press the Power/Mode button.
- To confirm selections, press the OK button.
- Use the UP or DOWN arrows as needed to change letters and numbers.
- Confirm your changes, highlight the “OK” selection and press the OK button on the camera to save.
Language
To change the default English language, you may do so here. Currently there are over 20 languages available.
Delete
There are two options available: Delete All will delete the entire contents of the memory card. Delete Current will only delete the last selected photo or video as shown on the preview mode.
Format
It’s always advised to format the memory card using the cameras firmware before first use. This will ensure the correct format and file system is installed. Ensure your microSD memory card is a 32GB or less microSD with a Class 10 or UHS-1 rating.
Default Setting
You can manually set the camera back to its default settings using this option.
Version
Displays camera firmware version.